

application.properties 나 application.yml을 통해 property들을 설정할 때, 각 profile별로 값을 제대로 설정했는지 알고 싶을 때가 있다. 가령 “alpha” 프로파일에는 잘 되던 것이 다른 프로파일일 때는 잘 안되서 확인해봤더니 필요한 property를 빼먹고 설정하지 않을 때가 있다.
spring:
  profiles: alpha

property:
  option_0: option_0_value
  option_1: option_1_value

...
---

spring:
  profiles: beta

property:
  option_0: option_0_value
위와 같이 option_1 property를 추가하고 배포할 때, beta 프로파일에서 해당 property를 추가하지 않아서 문제를 일으킬 것이다.
배포 중에 문제를 확인하여 고치지 말고 Spring Boot에서 지원하는 validation check 를 통해 테스트 중에 property들이 제대로 설정했는지 테스트를 할 수 있으면 좋을 것이다.
Spring Boot Reference Guide의 24.7.4 @ConfigurationProperties Validation 확인해보면 알겠지만 Spring Boot와 Hibernate, javax.validation 에서 제공하는 annotation을 통해 property를 설정했는지 안했는지 체크할 수 있다.
다음과 같이 application.yml 에 property들을 설정했다고 해보자.
mybatis:
  config-location: classpath:db/mybatis-config.xml
  mapper-locations: classpath:db/mapper/*.xml
  type-aliases-package: com.example.dao
위의 property의 validation을 체크하기 위해 Spring Boot Reference Guide, 24.7 Type-safe Configuration Properties 절에 나와 있는 것 처럼 다음과 같이 클래스를 정의해야 한다.
import org.springframework.boot.context.properties.ConfigurationProperties;
import lombok.Data;

@ConfigurationProperties(prefix = "mybatis")
@Data
public class MybatisProperties {

	private String configLocation;

	private String mapperLocations;

	private String typeAliasesPackage;
}
그리고 다음과 같이 Hibernate의 @NotEmpty annotation, 그리고 Spring Boot의 @Configuration, @Validated annotation을 통해 validation을 체크할 수 있다.
import org.hibernate.validator.constraints.NotEmpty;
import org.springframework.boot.context.properties.ConfigurationProperties;
import org.springframework.context.annotation.Configuration;
import org.springframework.validation.annotation.Validated;
import lombok.Data;

@Configuration
@ConfigurationProperties(prefix = "mybatis")
@Validated
@Data
public class MybatisProperties {

	@NotEmpty
	private String configLocation;

	@NotEmpty
	private String mapperLocations;

	@NotEmpty
	private String typeAliasesPackage;
}
import org.junit.Test;
import org.junit.runner.RunWith;
import org.springframework.beans.factory.annotation.Autowired;
import org.springframework.boot.test.context.SpringBootTest;
import org.springframework.test.context.ActiveProfiles;
import org.springframework.test.context.junit4.SpringRunner;

import com.toast.cloud.image.properties.MybatisProperties;

@RunWith(SpringRunner.class)
@SpringBootTest
@ActiveProfiles("alpha")
public class AlphaPropertyValidationTest {

	@Autowired
	private MybatisProperties mybatisProperties;

	@Test
	public void test() {
    ...
	}
}
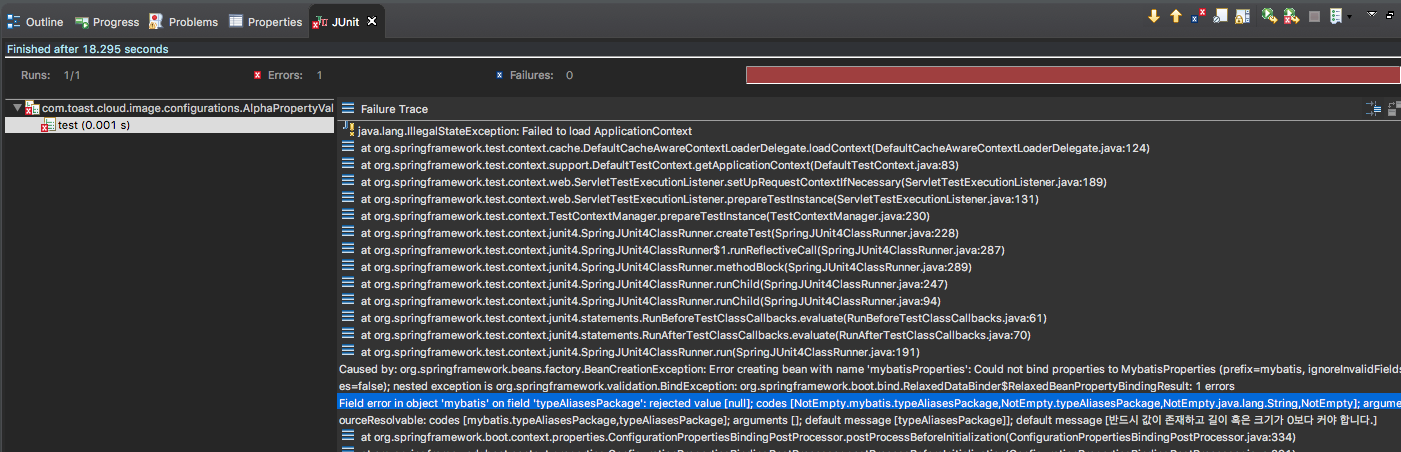
위와 같이 테스트 클래스에서 해당 property 클래스 오브젝트를 주입받고 테스트를 진행할 때, 만약 실수로 property 설정하는 것을 잊었다면 테스트 단계에서 걸러낼 수 있을 것이다. 만약 type-aliases-package property를 실수로 설정하지 않았다면 다음과 같이 테스트 과정에서 fail이 발생하는 것을 알 수 있다.
좀 더 복잡한 예를 살펴보자. 다음과 같이 property가 중첩되어 정의되어 있으면 어떻게 클래스를 정의할까?
spring:
  datasource:
    driver-class-name: com.mysql.jdbc.Driver
    url: jdbc:mysql://localhost:3306/sample_db?useUnicode=true&characterEncoding=UTF-8
    username: sample
    password: sample1234
위의 예에서는 spring - datasource - … 단계로 property가 중첩되어 있다. 이렇게 property가 중첩되어 정의되어 있으면 똑같이 클래스를 정의할 때도 static 이너 클래스를 추가로 정의하고 해당 클래스의 오브젝트를 필드로 정의해야 한다.
import javax.validation.Valid;

import org.hibernate.validator.constraints.NotEmpty;
import org.springframework.boot.context.properties.ConfigurationProperties;
import org.springframework.context.annotation.Configuration;
import org.springframework.validation.annotation.Validated;

import lombok.Data;

@Configuration
@ConfigurationProperties(prefix = "spring")
@Validated
@Data
public class SpringProperties {

	@Valid
	private final DataSource datasource = new DataSource();

	@Data
	public static class DataSource {

		@NotEmpty
		private String driverClassName;

		@NotEmpty
		private String url;

		@NotEmpty
		private String username;

		@NotEmpty
		private String password;
	}
}
위의 예에서 datasource 가 중첩되어 있는데 해당 부분을 static 이너 클래스로 정의하고, 안에 필드로써 property들을 정의하였다. 그리고 해당 클래스의 오브젝트를 필드로 정의하고, javax.validation의 @Valid annotation을 추가해주면 된다.