

Jersey는 Java에서 Restful API를 사용하는 서버를 아주 간단하게 구현할 수 있게 도와주는 web framework이다. GlassFish 프로젝트의 서브 프로젝트이며, JAX-RS(JSR 311) 스펙에 따른 구현체이다.
JAX-RS 표준을 구현한 공식 레퍼런스 구현체로, Java 플랫폼에서는 Restful Web Service를 높은 생산성으로 쉽게 구현할 수 있게 해준다. (JAX-RS 표준이 서버만을 고려하여 작성된 데에 비해, Jersey는 클라이언트 입장에서도 서비스를 편리하게 사용할 수 있도록 구현되었다.)
이 web application framework는 JAX-RS 스펙에 맞게 구현되었기 때문에, JAX-RS 를 알아야 이해할 수 있다.
Spring Web MVC는 JSR-311을 따르지는 않지만 Rest 기반의 웹 서비스 개발에 필요한 기능 대부분을 구현하고 있다. 하나의 자원을 여러 개의 Representation(JSON / XML / ATOM / RSS 등)으로 표현할 수 있고, 무엇보다도 Spring이 지원하는 강력한 기능을 사용할 수 있다는 장점이 있다.
JAX-RS는 인터페이스의 콜렉션으로, REST API를 서비스하는 서버 애플리케이션 개발을 쉽게 만들어즈는 자바 플랫폼에서 경량화된 REST 방식의 웹 애플리에키션 구현을 지원하는 자바 API 이다. JAX-RS 기술을 이용하면 REST(Representational State Transfer) 응용 프로그램은 기타 분배 시스템 유형에 비해 개발 및 이용이 용이하다.
대표적인 annotation으로 @Path, @GET, @POST, @PUT 등이 있다.
만약 다음과 같은 REST 서비스를 위한 클래스를 만든다고 생각해보자.
public class HelloJerseyEndPoint {

    ...
}
Jersey를 사용해서 기본적으로 다음과 같이 @Path annotation을 붙이고 메소드를 정의하면 된다.
import javax.ws.rs.Path;

@Path("/helloworld")
public class HelloJerseyEndPoint {

    public String sayHelloWorld() {
      return "Hello World!";
    }
}
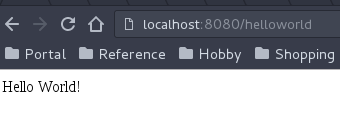
위의 코드와 같이 작성할 경우, /helloworld 에 대해 HTTP 요청이 수신될 때마다 sayHelloWorld 메소드가 호출되어 다음의 결과를 확인할 수 있다.
만약 다음과 같이 @Get annotation을 메소드에 붙일 경우 GET 요청에 대해서만 메소드가 호출될 것이다.
import javax.ws.rs.Path;
import javax.ws.rs.Get;
@Path("/helloworld")
public class HelloJerseyEndPoint {

    @Get
    public String sayHelloWorld() {
      return "Hello World!";
    }
}
물론, 다음과 같이 메소드에 추가적으로 path를 붙여나갈 수도 있다.
@Component
@Path("/helloworld")
public class HelloWorldEndPoint {

    @GET
    @Path("/message")
    public String sayHelloWorld() {
        return "Hello World!";
    }
}
Spring Boot에서는 Jersey를 활용하여 Rest API를 구현할 수 있도록 지원한다. 다음과 같이 pom.xml에 Jersey starter 의존성을 추가하여 사용가능하다.
<dependency>
   <groupId>org.springframework.boot</groupId>
    <artifactId>spring-boot-starter-jersey</artifactId>
</dependency>
먼저 Spring Boot와의 테스트를 진행하기 위해 POJO 를 추가하자.
package com.nhnent.hellospringboot.entity;

public class User {

    private long idx;
    private String email;
    private String name;

    // getter, setter 생략
그리고 위의 POJO를 다루기 위한 service 클래스를 생성한다.
package com.nhnent.hellospringboot.service;

import java.util.HashMap;
import java.util.Map;

import javax.annotation.PostConstruct;
import org.springframework.stereotype.Service;
import com.nhnent.hellospringboot.entity.User;

@Service
public class UserService {

    private Map<String, User> users;

    @PostConstruct
    private void loadUser() {

        users = new HashMap<>();

        users.put("1",  new User(0, "dhsim86@example.com", "Dongho Sim"));
        users.put("2",  new User(1, "dhsim86@naver.com", "Dongho Sim - Naver"));
    }

    public User findById(String id) {
        return users.get(id);
    }
}
이 service 클래스는 빈 생성 후 map에 먼저 유저 정보 2개를 저장해두며, id 값을 통해 User 클래스의 오브젝트를 리턴하게 만들었다.
먼저 Spring Boot와 연동하기 위해 다음과 같은 Configuration 클래스를 추가해야 한다.
package com.nhnent.hellospringboot;

import javax.ws.rs.ApplicationPath;
import javax.ws.rs.ext.ContextResolver;
import javax.ws.rs.ext.Provider;

import org.glassfish.jersey.server.ResourceConfig;
import org.springframework.beans.factory.annotation.Autowired;
import org.springframework.stereotype.Component;

import com.fasterxml.jackson.databind.ObjectMapper;
import com.nhnent.hellospringboot.controller.HelloJerseyEndPoint;
import com.nhnent.hellospringboot.controller.HelloWorldEndPoint;

@Component
@ApplicationPath("/v1")
public class JerseyConfig extends ResourceConfig {

    @Autowired
    public JerseyConfig(ObjectMapper objectMapper) {

        //packages("com.nhnent.hellospringboot");

        register(HelloJerseyEndPoint.class);
        register(new ObjectMapperContextResolver(objectMapper));
    }

    @Provider
    public static class ObjectMapperContextResolver implements ContextResolver<ObjectMapper> {

        private final ObjectMapper objectMapper;

        public ObjectMapperContextResolver(ObjectMapper objectMapper) {
            this.objectMapper = objectMapper;
        }

        @Override
        public ObjectMapper getContext(Class<?> type) {

            return objectMapper;
        }
    }
}
위 코드와 같이 ContextResolver 및 Jersey를 통해 URL mapping 하는 Endpoint 클래스들을 register 함수를 통해 등록하자.
@ApplicationPath annotation으로 “/v1” 으로 등록하였다. 이는 EndPoint가 서비스하는 모든 URI가 “/v1” 밑에 매핑한다는 것을 의미한다.
EndPoint는 Spring 의 Controller와 비슷하게 URL mapping하는 지원하는 클래스를 말한다.
다음과 같이 EndPoint를 추가한다.
package com.nhnent.hellospringboot.controller;

import javax.ws.rs.GET;
import javax.ws.rs.Path;
import javax.ws.rs.PathParam;
import javax.ws.rs.Produces;
import javax.ws.rs.core.MediaType;

import org.springframework.beans.factory.annotation.Autowired;
import org.springframework.stereotype.Component;

import com.nhnent.hellospringboot.entity.User;
import com.nhnent.hellospringboot.service.UserService;

@Component
@Path("/users")
public class HelloJerseyEndPoint {

    @Autowired
    private UserService userService;

    @GET
    @Path("/{id}")
    @Produces(MediaType.APPLICATION_JSON)
    public User getEventVersion1(@PathParam("id") String id) {

        return userService.findById(id);
    }
}
이 EndPoint는 /user/{id} 를 통해 들어온 id 값을 가지고 user 오브젝트를 찾아 JSON 형태로 리턴하도록 구현하였다. HelloJerseyEndPoint는 루트 path로 /users 로 등록하였기 때문에, 이 클래스 안의 모든 메소드들은 이 URI 밑에 매핑된다.
Spring Boot의 annotation을 같이 사용 가능하다.
그리고 이 클래스의 getEventVersion1 메소드에는 @Path(“/{id}”) 와 @GET, @Produces(MediaType.APPLICATION_JSON) annotation을 붙였는데, 이는 /user/{id} 에 대한 GET 요청이 들어오면 JSON 형태로 값을 리턴한다는 의미이다.
@GET 말고도 @POST, @DELETE, @PUT을 지원한다.
“{id}”와 같이 값을 넘길 때 @PathParam으로 메소드의 파라미터와 매핑시킨다. Spring Boot의 @PathVariable과 비슷하다.
@Produces annotation은 이 메소드가 어떠한 형태의 값을 리턴할지를 지정하는 것이다. 다음 코드를 보면 알겠지만 다양한 형태를 지원하는 것을 알 수 있다.
@SuppressWarnings("JavaDoc")
public class MediaType {

    private String type;
    private String subtype;
    private Map<String, String> parameters;

    public static final String CHARSET_PARAMETER = "charset";
    public static final String MEDIA_TYPE_WILDCARD = "*";
    public final static String WILDCARD = "*/*";
    public final static MediaType WILDCARD_TYPE = new MediaType();
    public final static String APPLICATION_XML = "application/xml";
    public final static MediaType APPLICATION_XML_TYPE = new MediaType("application", "xml");
    public final static String APPLICATION_ATOM_XML = "application/atom+xml";
    public final static MediaType APPLICATION_ATOM_XML_TYPE = new MediaType("application", "atom+xml");
    public final static String APPLICATION_XHTML_XML = "application/xhtml+xml";
    public final static MediaType APPLICATION_XHTML_XML_TYPE = new MediaType("application", "xhtml+xml");
    public final static String APPLICATION_SVG_XML = "application/svg+xml";
    public final static MediaType APPLICATION_SVG_XML_TYPE = new MediaType("application", "svg+xml");
    public final static String APPLICATION_JSON = "application/json";
    ...
위의 코드들을 작성 후 실행한 결과로 다음과 같이 User 클래스의 오브젝트라 JSON 형태로 리턴되는 것을 확인할 수 있었다.

–
jar로 실행할 때 Jersey와 관련해서 다음과 같이 embedded tomcat이 실행 실패하는 문제가 있었다.
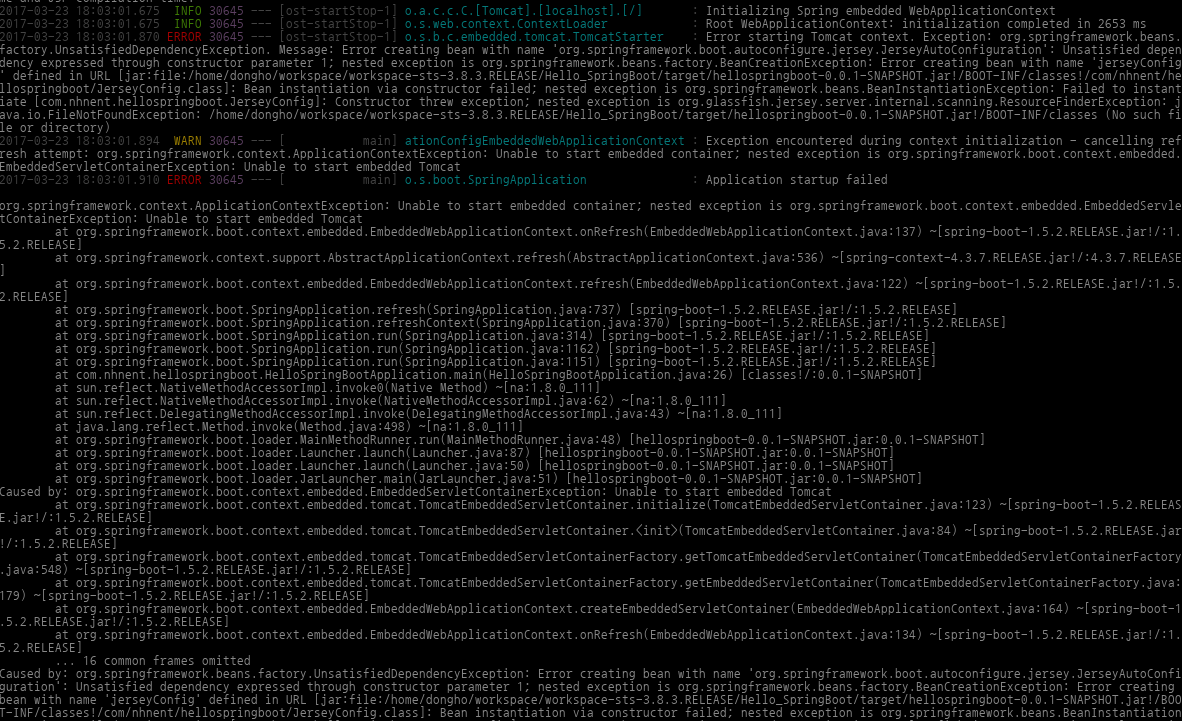
오류 메시지를 보니 JerseyConfig 클래스로부터 빈 생성하는 것이 실패했다고 나오는데, 이는 JerseyConfig에서 packages 메소드를 호출했을 때 발생하는 문제였다.
@Component
@ApplicationPath("/v1")
public class JerseyConfig extends ResourceConfig {

    @Autowired
    public JerseyConfig(ObjectMapper objectMapper) {

        packages("com.nhnent.hellospringboot"); //<< 이 부분

        register(HelloJerseyEndPoint.class);
        register(new ObjectMapperContextResolver(objectMapper));
    }
원래 packages 메소드는 풀 패키지명을 지정해서 이를 기반으로 Jersey 컴포넌트를 스캔하라는 것인데, Spring Boot와 연동할 때는 이 메소드를 쓰면 안되는 것으로 Reference Guide에 나와있다.
따라서 Spring Boot와 연동시에는 각 EndPoint들을 register 함수를 통해 일일이 등록해야 한다.
packages 메소드를 쓰지 않고 register 메소드를 통해 EndPoint를 등록하여 실행한 결과를 확인하니 문제없이 실행되는 것을 확인할 수 있었다.
