

Spring Boot Reference Guide Part4, Chapter 25까지의 Review
SpringApplication 클래스는 main method로부터 시작하는 Spring 애플리케이션을 쉽게 시작할 수 있도록 도와주는 클래스이다. 보통 Spring Boot를 사용한다면 다음과 같이 main method가 작성되어 있을 것이다.
public static void main(String[] args) {
  SpringApplication.run(MySpringConfiguration.class, args)
}
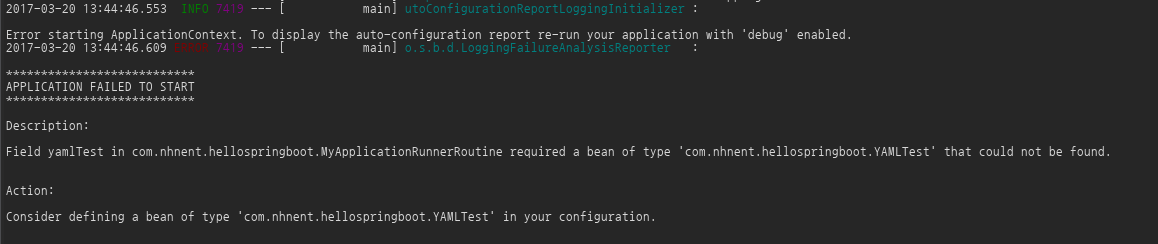
만약 애플리케이션을 시작하는데 실패하면 FailureAnalyzers를 통해 에러 메시지를 확인하여 대응할 수 있다.
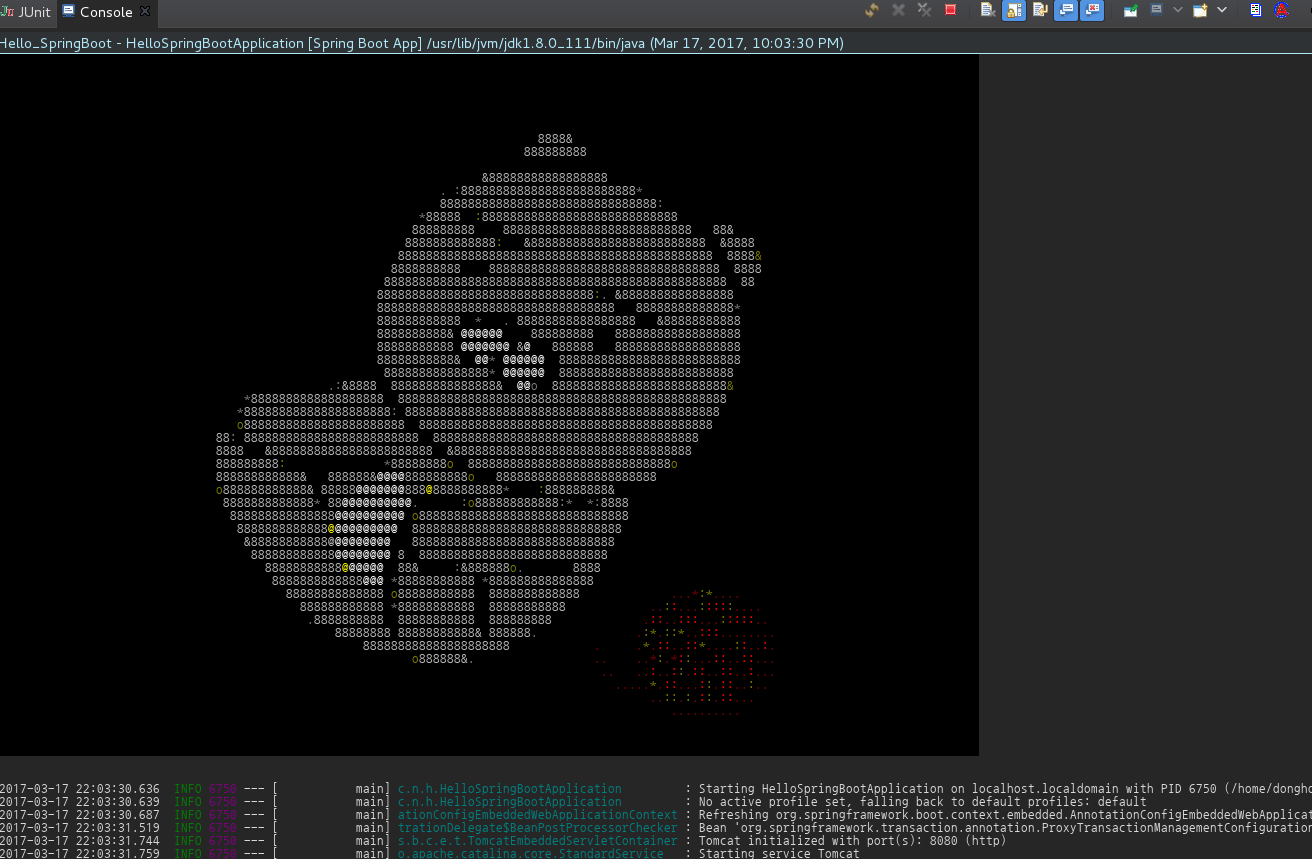
배너는 Spring Boot 애플리케이션이 시작될 때, 출력되는 것으로 banner.txt를 클래스패스에 추가하는 것으로 기본적으로 출력되는 배너를 바꿀 수 있다.
Spring Boot 1.1 버전부터 커스터마이징이 가능하지만 1.4버전까지 업데이트되면서 그림파일도 넣을 수 있다.
그림파일을 아스키코드로 바꾸어 변경해주는 것을 통해 사용하고 싶은 그림으로 배너를 바꿀 수 있다. 그리고 1.4버전부터는 gif, jpg, png 이미지 파일을 직접 배너로 설정하는 것도 가능하다.
사용하고 싶은 배너를 banner.txt 라는 이름으로 src/main/resource 폴더에 넣어주기만 하면 다음과 같이 바뀌는 것을 확인할 수 있다.
main 메소드에서 SpringApplication이 사용하는 디폴트 설정들을 쓰지 않고 몇몇 부분들을 정의하여 사용하고자할 때, main 메소드에서 다음과 같이 작성한다.
@SpringBootApplication
public class HelloSpringBootApplication {

	public static void main(String[] args) {
		//SpringApplication.run(HelloSpringBootApplication.class, args);
	    SpringApplication app = new SpringApplication(HelloSpringBootApplication.class);
	    app.setBannerMode(Banner.Mode.OFF);
	    app.run(args);
	}
}
SpringApplcation.run static 메소드는 내부적으로 SpringApplication을 생성 후 run을 호출한다. run static 메소드를 사용하는 대신에 직접 SpringApplication 객체를 생성 후 run 을 호출하였다.
SpringApplication 객체의 run 메소드로 넘어가는 파라미터인 args 는 @Configuration class의 정보나 XML configuration 등 Spring 빈을 생성하기 위해 스캔해야될 정보이다.
소스가 아니더라도 src/main/resources 에 있는 application.properties를 통해 SpringApplication 설정 정보를 다음과 같이 변경할 수 도 있다.
 spring.mvc.view.prefix: /WEB-INF/jsp/
 spring.mvc.view.suffix: .jsp
SpringApplication run 에 넘겨지는 파라미터, args를 확인하고 싶다면 다음과 같이 ApplicationArgument 인터페이스를 통해 확인한다.
package com.nhnent.hellospringboot;

import java.util.Iterator;
import java.util.List;
import java.util.Set;

import org.slf4j.Logger;
import org.slf4j.LoggerFactory;
import org.springframework.beans.factory.annotation.Autowired;
import org.springframework.boot.ApplicationArguments;
import org.springframework.stereotype.Component;

@Component
public class ArgsCheck {

    private static final Logger logger = LoggerFactory.getLogger(ArgsCheck.class);

    @Autowired
    public ArgsCheck(ApplicationArguments args) {

        Set<String> argsList = args.getOptionNames();

        Iterator<String> iter = argsList.iterator();

        logger.info("ArgsCheck");
        while (iter.hasNext()) {

            String paramName = iter.next();
            List<String> valueList = args.getOptionValues(paramName);

            for (String value : valueList) {

                logger.info("[" + paramName + "] " + value);
            }

        }
    }

}
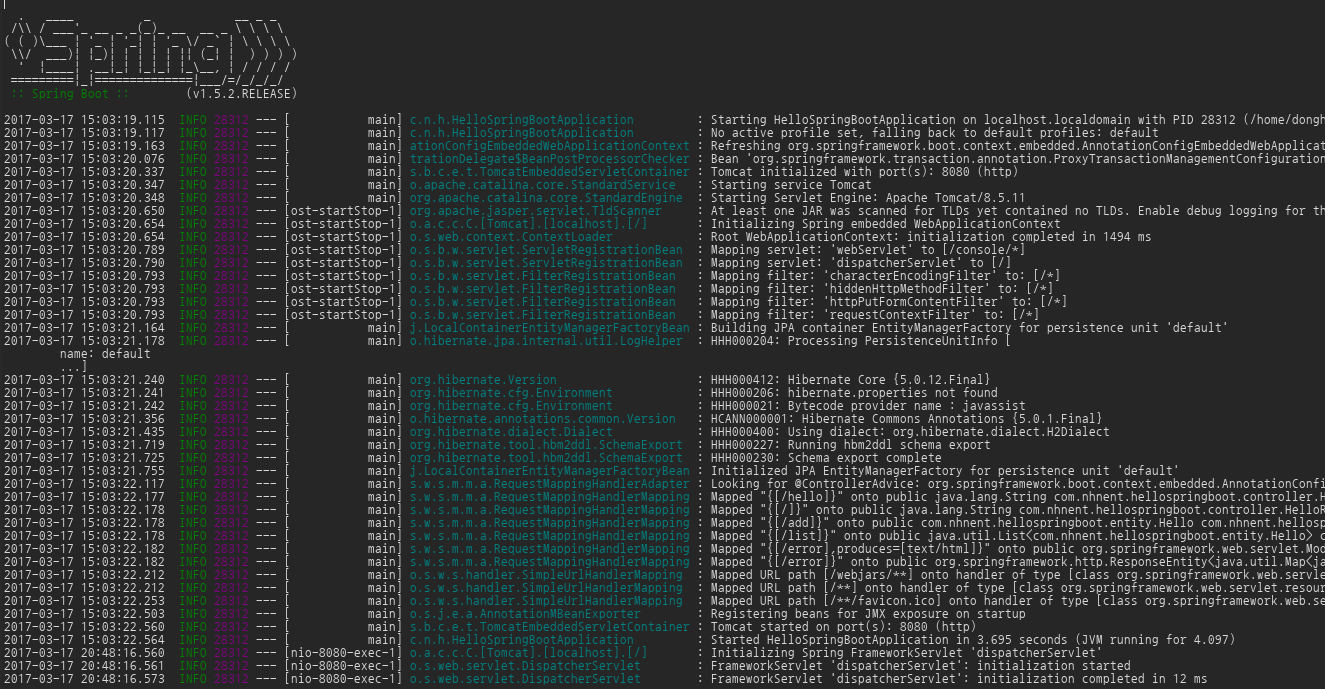
그러면 console 창에서 다음 그림과 같이 확인할 수 있다.

SpringApplication을 시작할 때, 수행해야할 루틴이 있다면 ApplicationRunner나 CommandLineRunner 인터페이스 구현을 통해 자신이 원하는 루틴을 실행할 수 있도록 할 수 있다.
루틴은 SpringApplication.run 이 끝나기 전에 한 번 실행된다.
@Component
public class MyCommandLineRoutine implements CommandLineRunner {

  private static final Logger logger = LoggerFactory.getLogger(MyCommandLineRoutine.class);

  public void run(String ... args) {

      logger.info("CommandLineRunner Do.");
  }
}
@Component
public class MyApplicationRunnerRoutine implements ApplicationRunner {

  private static final Logger logger = LoggerFactory.getLogger(MyApplicationRunnerRoutine.class);

  public void run(ApplicationArguments args) {

      logger.info("ApplicationRunner Do.");
  }
}
위의 코드를 작성하였을 때 다음과 같이 콘솔에서 확인할 수 있다.

Spring Boot에서는 application.propertes 대신에 YAML 형식의 파일을 대신 property 추가에 사용할 수 있다.
YAML 파일 형식에서는 다음과 같이 property를 셋팅한다.
spring:
  mvc:
    view:
      prefix: /WEB-INF/jsp/
      suffix: .jsp
또한 한 property에 여러 개의 값을 추가하고 싶을 때는 - 를 쓸 수 있다.
my:
  servers:
    - dev.bar.com
    - foo.bar.com
위의 property를 사용하고자 할 때는 다음과 같이 java code를 작성한다.
import org.springframework.boot.context.properties.ConfigurationProperties;
import org.springframework.stereotype.Component;

@Component
@ConfigurationProperties(prefix="my")
public class YAMLTest {

    private List<String> servers = new ArrayList<String>();

    public List<String> getServers() {

        return servers;
    }
}
그러면 2개의 server 도메인 이름이 servers List에 차례로 주입될 것이다.
spring.profiles를 사용해 한 YAML 파일에서 다양한 프로파일에 대한 property를 지정할 수 있다.
server:
  address: 192.168.1.100
---
spring:
  profiles: development
server:
  address: 127.0.0.1
---
spring:
  profiles: production
server:
  address: 192.168.1.120
위의 상황에서 development 프로파일에 대해서는 server.address가 127.0.0.1로 셋팅되고, 프로파일을 지정하지 않았을 경우 192.168.1.100으로 셋팅된다.
밑의 YAML 파일에서는 security.user.password property 는 오로지 development 프로파일에 대해서만 셋팅된다.
server:
  port: 8000
---
spring:
  profiles: development
security:
  user:
    password: weak
그렇지만 다음과 같이 작성하면 모든 프로파일에 대해서 사용할 수 있다.
server:
  port: 8000
security:
  user:
    password: weak
다음과 같은 class를 통해 @Value annotation 및 properties 파일을 사용할 필요없이 property를 설정하는 것과 같은 효과를 낼 수 있다.
@ConfigurationProperties("foo")
public class FooProperties {

  private boolean enabled;
  private InetAddress remoteAddress;
  private final Security security = new Security();

  public boolean isEnabled() {...}
  public void setEnabled(boolean enabled) {...}
  public InetAddress getRemoteAddress() {...}
  public void setRemoteAddress(InetAddress remoteAddress) {...}
  public Security getSecurity() {...}

  public static class Security {

    private String username;
    private String password;
    private List<String> roles = new ArrayList()(Collections.single-ton("USER"));

    public String getUserName() {...}
    public void setUserName(String username) {...}
    public String getPassword() {...}
    public void setPassword(String password) {...}
    public List<String> getRoles() {...}
    public void setRoles(List<String> roles) {...}
  }
}
이 클래스는 다음과 같이 property들을 정의한다.
이 클래스로 정의된 property를 다른 곳에서 사용하고자 할 때는 다음과 같이 @EnableConfigurationProperties 를 사용한다.
@Configuration
@EnableConfigurationProperties(FooProperties.class)
public class MyConfiguration {

}
Spring Boot는 @ConfigurationProperties annotation으로 properties 파일로부터 property를 읽어 특정 클래스의 필드로 로드할 때, 필드의 이름과 properties안에 있는 해당되는 property 이름이 완전히 같지 않아도 된다.
예를 들어 다음과 같이 person 으로 시작하는 property로 구성하는 클래스가 있다고 하자.
@ConfigurationProperties(prefix="person")
public class OwnerProperties {

  private String firstName;

  public String getFirstName() {
    return this.firstName;
  }

  public void setFirstName(String firstName) {
    this.firstName = firstName;
  }
}
위 클래스의 필드 “firstName” 에 대해 properties 파일에서는 다음과 같이 다양한 property 이름으로도 로드될 수 있다.
person.firstName

person.first-name

person.first_name

PERSON_FIRST_NAME
많이 사용되는 @Value annotation은 이것을 지원하지 않는다.