

이 포스트는 자바 웹 개발을 진행할 때 가장 많이 사용하는 framework인 Spring에서의 IoC 컨테이너, 즉 ApplicationContext에 대한 이해를 하고자, Spring을 사용하지 않고 특정 파일로부터 내용을 읽어 자동으로 필요한 빈 생성 및 의존관계 주입을 수행하는 “Custom ApplicationContext” 를 직접 구현하는 내용을 다룬 포스트이다.
Spring MVC에서 주로 사용하는, 스프링 빈 정보를 담고 있는 일명 ApplicationContext…xml 과 같은 파일을 만들어보자. 여기서는 간단하게 key=value 로 구성하도록 한다. 가령 다음과 같이 작성할 수 있을 것이다.
dataSource=org.apache.commons.dbcp.BasicDataSource
Spring에서는 ApplicationContext.xml로부터 정보를 읽어 빈 생성 및 주입을 하지만, annotation을 통해 스프링 빈을 선언하고 다음과 같이 xml에 정의하면 자동으로 특정 annotation이 선언된 클래스를 검색하여 빈을 관리하다.
<context:component-scan base-package="com.nhnent.spring" />
@Component
public class ExampleController {
  ...
}
위와 같이 @Component 가 선언된 클래스에 대해서 Spring은 자동으로 빈 생성하고 의존관계를 주입할 것이다. component-scan에 대한 자세한 내용은 다음 글을 참조하자.
스프링 <context:component-scan> 분석
여기서도 @Component 라는 이름으로 custom annotation을 다음과 같이 정의한다.
import java.lang.annotation.Retention;
import java.lang.annotation.RetentionPolicy;

@Retention(RetentionPolicy.RUNTIME)
public @interface Component {
	String value() default "";
}
Tomcat과 같은 ServletContainer는 웹 애플리케이션의 상태를 모니터링 할 수 있도록 웹 애플리케이션의 시작에서 종료까지, 주요한 사건에 대한 알림 기능을 제공한다.
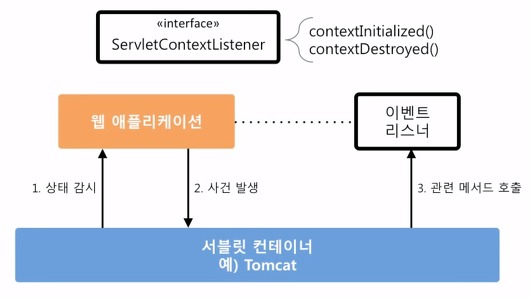
이를 ServletContextListener 라고 하는데, Spring에서는 ApplicationContext를 등록하고 DB 연결 기능이나 로깅 같은 서비스를 만드는데 이 ServletContextListener 인터페이스를 구현한 ContextLoaderListener 를 제공한다. Spring 으로 웹 개발을 하면 으레 web.xml에는 다음과 같이 ContextLoaderListener 선언이 있을 것이다.
<!-- Creates the Spring Container shared by all Servlets and Filters -->
<listener>
  <listener-class>org.springframework.web.context.ContextLoaderListener</listener-class>
</listener>
여기서도 Custom ContextLoaderListener 를 구현하여, 애플리케이션이 시작될 때 ApplicationContext가 프로퍼티와 annotation을 통해 필요한 빈 생성 및 의존관계 주입을 진행 하도록 할 것이다.
다음과 같이 ServletContextListener 인터페이스로부터 구현하도록 할 수 있다.
@WebListener
public class ContextLoaderListener implements ServletContextListener {

  // Custom ApplicationContext 선언
  static ApplicationContext applicationContext;

  public static ApplicationContext getApplicationContext() {
    return applicationContext;
  }

  @Override
  public void contextInitialized(ServletContextEvent event) {
    // ApplicationContext가 property 파일이나 Annotation을 통해 빈 생성 및 의존 관계 주입
  }

  @Override
  public void contextDestroyed(ServletContextEvent event) {
    // DB 연결 종료와 같은 자원 해제 코드
  }
}
Custom ApplicationContext는 위에서 준비한 property 파일과 @Component annotation, 그리고 custom ContextLoaderListener를 통해 자동으로 빈을 생성하고 빈 간의 의존관계를 주입하도록 구현할 것이다.
앞서 만든 property 파일에는 key=value 쌍으로 빈 정보를 정의하였고, @Component annotation 또한 annotation 정보로 빈의 이름을 정의하도록 하였다.
여기서 ApplicationContext는 key를 빈의 이름으로 value를 해당 빈 오브젝트 로 관리하도록 할 것이다. 그럼 다음과 같이 ApplicationContext를 구현할 수 있다.
public class ApplicationContext {

	Hashtable<String, Object> objTable = new Hashtable<>();

	public Object getBean(String key) {
		return objTable.get(key);
	}
먼저 ApplicationContext가 property 파일을 읽어 빈 생성 및 관리를 할 수 있도록 하자. 앞서 만든 property 파일은 다음과 같이 key=value 쌍으로 만들었다.
dataSource=org.apache.commons.dbcp.BasicDataSource
이 파일을 쉽게 읽을 수 있도록 Java 에서는 Properties 클래스를 제공한다. 위와 같은 파일이 있을 때 코드 상에서 다음과 같이 쉽게 파일을 읽어 key / value 를 로드할 수 있다.
Properties props = new Properties();
props.load(new FileReader(propertiesPath));
...
for (Object item : props.keySet()) {

  key = (String)item;
  value = props.getProperty(key);
...
ApplicationContext에서도 해당 클래스를 통해 property 파일을 읽어 value, 즉 클래스 이름을 통해 빈의 인스턴스를 생성하고 objTable 에 key (빈의 이름)으로 관리하도록 다음과 같이 구현한다.
public ApplicationContext(String propertiesPath) throws Exception {
  Properties props = new Properties();
  props.load(new FileReader(propertiesPath));

  prepareObjects(props);
  ...
}
private void prepareObjects(Properties props) throws Exception {
  String key = null;
  String value = null;

  for (Object item : props.keySet()) {

    key = (String)item;
    value = props.getProperty(key);

    ...

    try {
      objTable.put(key, Class.forName(value).newInstance());
    }
    catch (ClassNotFoundException e) {
      ...
    }
  }
}
이번에는 아까 정의한 @Component annotation 을 통해 빈 생성을 하도록 하자. 여기서는 리플렉션 이라는 클래스의 정보를 분석하는 기법을 사용할 것이다. 예를 들어 자바 클래스 가진 모든 필드의 이름을 얻거나 메소드의 리스트를 얻을 수 있다.
자바에서는 기본적으로 java.lang.reflect 패키지를 통해 리플렉션 기능을 제공하지만 여기서는 Reflections 라이브러리를 사용한다. 특정 패키지를 베이스로 하여 모든 클래스를 검색하는 기능을 필요한데 자바에서 제공하는 기본 리플렉션 기능으로는 코드가 길어지기 때문이다.
먼저 Reflections 라이브러리를 사용하기 위해 다음과 같이 의존성을 추가한다.
<dependency>
    <groupId>org.reflections</groupId>
    <artifactId>reflections</artifactId>
    <version>0.9.10</version>
</dependency>
Reflections 라이브러리의 사용법은 다음 사이트를 참조한다. Class Reflections
이 라이브러리를 써서 ApplicationContext는 특정 annotation (여기서는 @Component) 이 선언된 모든 클래스를 검색하여 인스턴스를 생성하도록 한다. 다음과 같이 구현할 수 있다.
public ApplicationContext(String propertiesPath) throws Exception {
  ...
  prepareAnnotationObjects();
  ...
}
private void prepareAnnotationObjects() throws Exception {

  Reflections reflector = new Reflections();

  Set<Class<?>> list = reflector.getTypesAnnotatedWith(Component.class);
  String key = null;

  for (Class<?> clazz : list) {
    key = clazz.getAnnotation(Component.class).value();
    objTable.put(key,  clazz.newInstance());
  }
}
@Component("memberDao")
public class MyCustomMemberDao implements MemberDao {
...
Property 파일 및 Annotation을 통해 빈을 생성했으니, 이제 등록한 빈 간의 의존관계를 주입할 차례이다.
여기서는 등록한 빈 오브젝트의 Class를 통해 메소드 리스트를 얻어 set 으로 시작하는 모든 메소드, 즉 setter를 모두 검색하여 해당 메소드의 파라미터 타입과 일치하는 빈을 서로 주입하도록 할 것이다.
다음과 같은 메소드를 통해 특정 오브젝트의 클래스 정보, 메소드 리스트, 파라미터 타입을 얻을 수 있다.
for (Method m : obj.getClass().getMethods()) {

  if (m.getName().startsWith("set")) {
    ...
    dependency = findObjectByType(m.getParameterTypes()[0]);
    ...
이를 이용해 다음과 같이 ApplicationContext 클래스에서 구현할 수 있다.
public ApplicationContext(String propertiesPath) throws Exception {
  ...
  injectDependency();
}

private void injectDependency() throws Exception {
  for (String key : objTable.keySet()) {
      callSetter(objTable.get(key));
  }
}

private void callSetter(Object obj) throws Exception {
  Object dependency = null;
  for (Method m : obj.getClass().getMethods()) {
    if (m.getName().startsWith("set")) {
      dependency = findObjectByType(m.getParameterTypes()[0]);
      if (dependency != null) {
        m.invoke(obj, dependency);
      }
    }
  }
}

private Object findObjectByType(Class<?> type) {
  for (Object obj : objTable.values()) {
    if (type.isInstance(obj)) {
      return obj;
    }
  }
  return null;
}
Spring으로 웹 개발 진행할 때 web.xml에서 빈 정보를 담는 context xml 의 path를 다음과 같이 지정한다.
<context-param>
  <param-name>contextConfigLocation</param-name>
  <param-value>classpath:/spring/root-context.xml</param-value>
</context-param>
여기서도 마찬가지로 web.xml에 property 파일이 저장된 path를 지정하고 ContextLoaderListener가 이 path를 ApplicationContext 생성자로 넘겨 property 파일을 읽을 수 있도록 한다.
<context-param>
    <param-name>contextConfigLocation</param-name>
    <param-value>/WEB-INF/application-context.properties</param-value>
</context-param>
다음과 같이 contextInitialized 메소드에서 contextConfigLocation 값을 얻은 후에 ApplicationContext를 생성하도록 하여, 웹 애플리케이션이 시작될 때 자동으로 빈 생성 및 의존관계를 주입할 수 있도록 하였다.
public class ContextLoaderListener implements ServletContextListener {

  static ApplicationContext applicationContext;

  public static ApplicationContext getApplicationContext() {
    return applicationContext;
  }

  @Override
  public void contextInitialized(ServletContextEvent event) {

    try {
      ServletContext sc = event.getServletContext();

      String propertiesPath = sc.getRealPath(sc.getInitParameter("contextConfigLocation"));
      applicationContext = new ApplicationContext(propertiesPath);
      ...
    }
    catch (Throwable e) {
      e.printStackTrace();
    }
  }
Spring 에서 제공하는 여러가지 ApplicationContext 와 비교하면 아주 간단한 로직이지만 Spring Framework에서 어떻게 컨테이너가 빈을 생성하고 의존관계를 주입할 수 있는지 이해를 쉽게 이해할 수 있을 것이다.
해당 내용은 Java Web Development Workbook Chapter. 06 의 내용을 바탕으로 작성된 것이다.